
Your basket

Monthly payment

  • every month for months, then
  • months contract
  • no annual contract

Monthly payment total

£xx

One-off payment

One-off payment total

£xx

Included with your package

Summary

Monthly payment

    One-off payments

    Reward Card included
    to say thanks for signing up
    Amazon gift card
    Amazon gift card to say thanks for signing up
    cashback icon
    Cashback to say thanks for signing up
    Today's payment
    Today's payment

    Send email from any connection - Windows 8 Mail

    How to enable SMTP Authentication on Windows 8 Mail.

    This article is not regularly maintained

    This archived article may contain information that's not up-to-date. It's here so you can still refer to this older info, but it's not regularly maintained and our Customer Support Advisors won't be able to help with queries about it.

    If you've got a question about this article, why not ask the Plusnet Community? Or, for the latest Help & Support articles, head over to Plusnet Help.

    If you use Windows 8 Mail on a laptop or tablet, you may have noticed that you can't send emails when connected to a different network (e.g. when on holiday or at a friend's house).

    This happens because our servers only allow Plusnet customers to use them. If you're connected to a different network, the server can't tell you're a customer. We'll show you how to fix this problem by switching on SMTP authentication.

    Please note:

    • We do not recommend using public Wi-Fi hotpots to check or send email. Find out more in our Wi-Fi security tips guide
    • This service is not available to customers using a free dial-up account
    • If you have multiple email accounts set up, you'll need to follow these instructions for each one


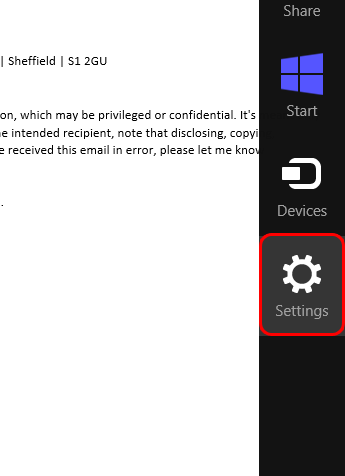
    1. In mail, open the Charms bar and choose Settings.

      Bring up the 'Charms' bar

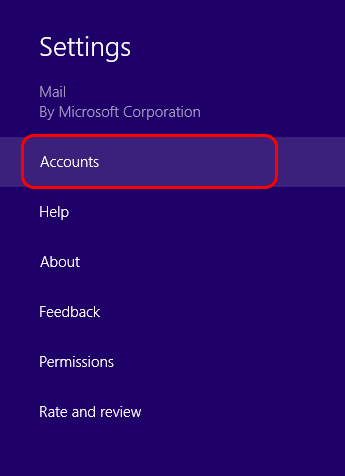
    2. From the Charms bar, choose Accounts.

      Choose 'Accounts' from the 'Charms bar'.

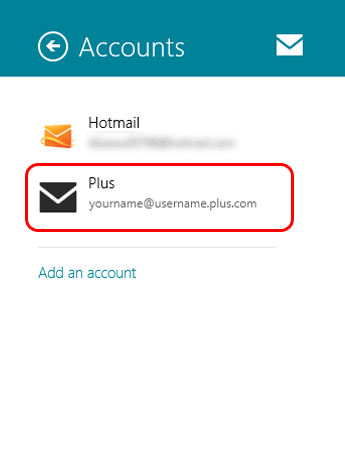
    3. You'll see a list of the email addresses currently set up. Choose your email account.

      Choose your email account from the list.

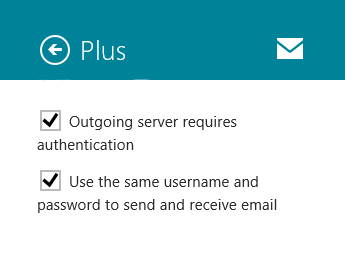
    4. Scroll down the settings list until you see Outgoing server requires authentication. Make sure it's ticked.

      Also make sure Use the same username and password to send and receive email is ticked.

      Make sure the settings are correct.

    5. Finally, click the back arrow at the top of the column to save the changes you've made.

      Click the back arrow to save your changes.
       

    That's all you need to do! From now on you'll be able to send email from any network you connect your computer to.

    This is an archived article and may contain information that's not up-to-date - more info

    This is an archived article and may contain information that's not up-to-date - more info

    Was this article helpful?

    Can’t find the answer to your question?